Kubectl is a powerful command-line tool for managing Kubernetes objects. It allows you to create, read, modify, and delete objects, and to establish relationships between them. It can be used to monitor and manage Kubernetes clusters and inspect workloads.
With it, you can perform CRUD operations, create or apply configuration files, access logs, and much more. Let’s take a closer look at Kubectl and how it can be used to manage Kubernetes objects.
Common Kubectl Commands
This is the command line interface for placing commands to create, delete and modify Kubernetes objects. In this guide, we will look at some of the common Kubectl commands used to manage Kubernetes objects.
The kubectl get command allows a user to inspect cluster resources. kubectl get pods will list all of a user’s pods in the namespace in which they are running the command, whereas kubectl get all –all-namespaces will list all available pods in all namespaces.
The kubectl describe can be used to return valuable data about an object or object type. For example, kubectl describe pod can return details about that particular pod and what it is running inside it. Similarly, kubectl describes a service that can be issued to find details on any service created from one of your Kubernetes applications with information on how to access it.
One of the most powerful commands offered by Kubectl is kubectl exec. The exec command allows you to have ssh like access to any pod and execute any command you like in one call. For example:
kubectl exec -it — /bin/bash will give a user ssh access into their pod’s internal terminal. This is especially useful if a user needs access deep into their software stack for troubleshooting or making configuration changes as if they were logged directly onto their machine itself.
Finally, users also have the ability to use aliases with Kubernetes using the kubectl alias set command. This makes entering lengthy Kubecenetes commands easier so users do not have to issue entire strings each time they are looking for memory info or modifying some setting within the system without entering hundreds of flags and switches every time.
Deploying Kubernetes Objects
Kubernetes makes it easy to deploy and manage various objects such as pods, containers, services, and deployments. To do this, you’ll need to use a command-line tool called kubectl.
In this section, we’ll take a look at how kubectl can be used to deploy Kubernetes objects.
Create Deployment
Deployments are objects in Kubernetes that help to deploy and manage applications on a cluster. A deployment creates and manages multiple copies of an application, referred to as replicas, intended to be all the same. It will ensure the desired number of replicas is maintained all the time while providing zero-downtime deploys and rollback mechanisms.
To create a deployment with kubectl, use the `create deployment` command. For example:
“`bash $ kubectl create deployment –image= “`
This will create a deployment with the image specified in `docker-img`. You may also specify options such as the number of replicas required (by default 1) as well as other configurations such as pod template configuration.
Update Deployment
Updating a Kubernetes deployment can be achieved using the kubectl command. Updates to existing deployments can be done in both the command line and through configuration files for manual updates. During a deployment update specified options such as image, port, resource requirements, node labels & environment variables can be modified.
Apart from updating existing Kubernetes objects in deployment, there are also certain operations that need to be carried out while updating such as:
- Configuring the rolling update strategy — specifies when and how the new version of your application should roll out
- Restarting policy — defines if any pods should be restarted during an update and whether only those pods affected by the changes need to be restarted
- Image pull policy — determines how images referenced by the object will be pulled from registries and updated during an update
- Health checks — determine when a rollout is considered successful or failed and will then allow resuming or reverting of the deployment in case of failure
- Annotations — supply contextual data about objects allowing an easier interpretation of results
By understanding these techniques you are better able to manage Kubernetes deployments and use them to their fullest potential when developing an application.
Delete Deployment
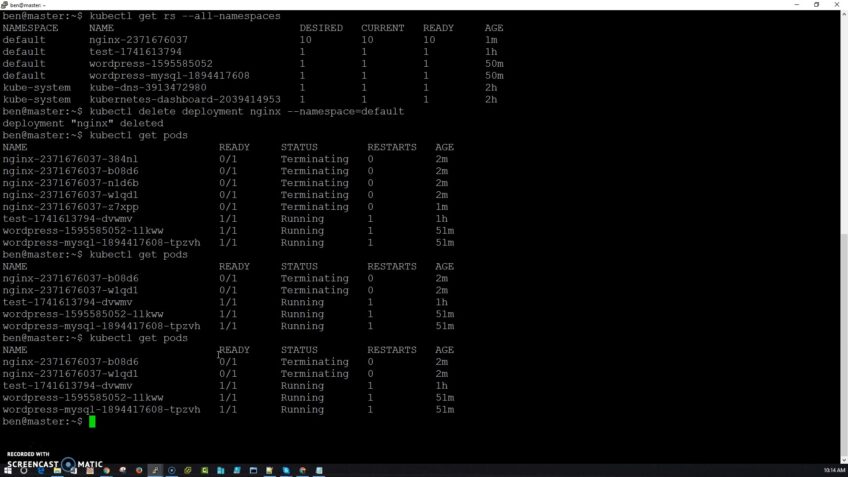
Deleting deployments in Kubernetes is accomplished through the Kubectl command-line utility. The most commonly used command to delete objects is ‘kubectl delete’. This command can be used to delete many different kinds of Kubernetes objects such as: deployments, services, namespaces, and other related objects.
To delete a deployment, you will use the following format:
`kubectl delete deployment [deployment name/ID] –namespace=[namespace name]`
Where ‘deployment name/ID’ indicates the specific deployment you want to delete and ‘namespace name’ corresponds with the namespace where the given object is located. For example:
`kubectl delete deployment my-deployment –namespace=default`
This command will remove a deployment named ‘my-deployment’ from the default namespace. Additionally, this command supports regular expression in order to match multiple resources at once. For example:
`kubectl delete deployment ‘my-.*’ –namespace=default `
This will remove all deployments whose names start with ‘my-” in the specified namespace. When running this command it’s important to note that any replica sets related to this deployment will also be removed along with all its pods and services associated with these replica sets.
Also read: How to Handle Merge Conflicts in Git
Managing Kubernetes Objects
With Kubectl, you can get detailed information about the objects running in your cluster, and you can monitor the health of the cluster.
Get Resources
One of the most important tasks to understand when managing Kubernetes objects with Kubectl is the `get` command. This command allows you to list and view available resources in your cluster. It’s useful for those just getting started with Kubernetes, as it provides an overview of objects and namespaces within the cluster that can be further explored and refined.
The syntax for `get` is straightforward: `kubectl get [resource type]`. Using this basic command will return a list of all available resources within that type, such as Pods, Deployments, Services, ConfigMaps, or PersistentVolumes (PVs). You can also specify a namespace with the command using `–namespace [name]` if you want to limit results within a given namespace or module.
You can use other flags to modify or refine your output such as `-o yaml | json`, which will format resource details into either YAML or JSON so they can be read by both humans and machines. For example: `kubectl get secret -o yaml –namespace monitoring` will get all Secrets from the “monitoring” namespace formatted into YAML format.
The output from the ‘get’ command is often referred to as verbose mode; it provides much more detailed information about each object including its name, self-link url addressable directly from a Kubernetes API server, labels — for grouping objects of similar types — annotations which provide additional notes about an object and a resource version which tracks when changes are made to an object’s attributes. Once you develop a better understanding of Kubernetes objects through verbose mode provided by Kubectl’s ‘get’ command you’ll be able to manage your cluster with confidence and skill!
Describe Resources
The kubectl command-line utility is an important tool for managing individual resources within Kubernetes clusters. In this tutorial, we’ll look at how to access Kubernetes objects from the command line and use a few basic commands to interact with those resources.
Kubernetes exposes its resources as objects that, just like operating system files, can be manipulated by various commands, either from a terminal or from automated scripts. Working with these objects requires knowledge of their resource types and the syntax for using different verbs to manipulate them.
The kubectl describe command returns details about one or more Kubernetes objects and their associated configuration data. Each kubectl describe command describes only one object type at a time; you need to specify an object type when requesting detailed information with the –f flag or when specifying a file containing configuration data in YAML or JSON format. For example:
`kubectl describe pods -f ./my/resources.yaml`
Kubernetes defines several resource types, including Deployment, Service, DaemonSet (for running daemons on every node), and other primitives such as ConfigMaps and Secrets that are used for general purposes such as storing key-value pairs for configuration settings across namespaces. Each resource type is associated with a verb such as get (for retrieving data), scale (to increase replicas of existing workloads), and create (to define new resources).
Edit Resources
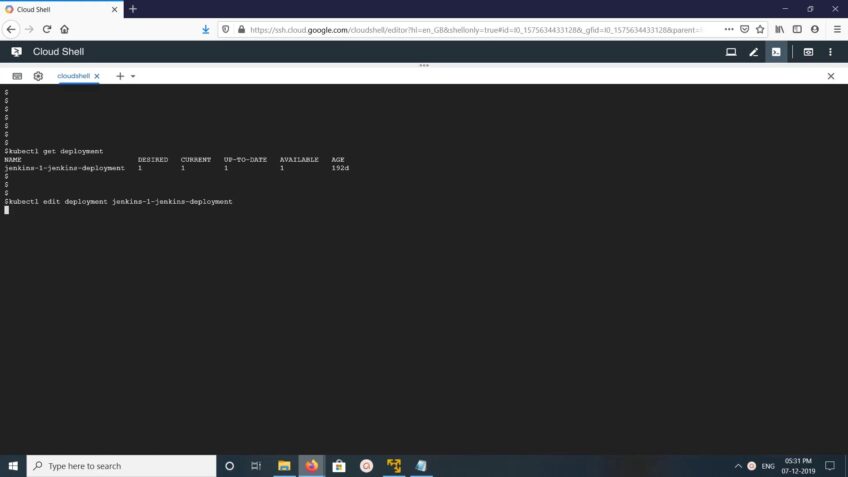
The kubectl edit command edits a resource from the default editor, or optionally from a specified editor. When you run this command, the configuration file of an existing resource is opened in an editor. The edited resource is applied to Kubernetes when you save it in the editor and come out of edit mode.
Before using kubectl edit, ensure you understand that changes you make might not be safe if more than one person or process can concurrently modify a resource. It is best to use commands such as kubectl apply and declarative configuration files (YAML/JSON) whenever possible instead of editing resources directly with kubectl edit.
By default, the EDITOR environment variable or configuration in your local kubeconfig file tells kubectl which text editor program to use for editing resources. If neither an environment variable nor a configuration option is set, then the vi editor is used by default.
Edit a Deployment by running the following command: `kubectl edit deployments/[deployment_name]`
Working with Kubernetes Objects
Kubectl is a command-line tool used to manage Kubernetes objects. It offers a wide range of features and functions that can help you easily manage and check Kubernetes objects.
It also offers an easy-to-use visual interface to help manage and monitor the objects in your cluster.
In this section, we will look at how to work with and manage Kubernetes objects using it.
Labeling Resources
Labels are key-value pairs used by Kubernetes to identify and manage related resources. It is an important feature of the Kubernetes API that provides flexibility for categorizing, labeling, and identifying individual resources within your Kubernetes cluster. Labeling allows you to make changes to multiple objects simultaneously by applying a single command or action across all resources with the same label.
Kubernetes objects, including pods, services, and deployments, are groupable based on their labels into different sets. For example, you can group nodes based on hardware architecture or application version. You can also attach multiple labels to a resource so that you can filter them later when searching for specific criteria.
Using kubectl label command, you can manage these labels in existing objects: create a new label, overwrite an existing label value, or delete an existing value from the object’s set of labels. To ensure consistency across cluster nodes and applications, it is important to define the labels before provisioning the resource. The following syntax should be used when working with labels using kubectl:
kubectl –labels=label1=value1[,labelN=valueN]
Annotating Resources
Annotations allow users to associate arbitrary non-identifying metadata with Kubernetes objects. You can use annotations to store additional information about your workloads such as operating system, version, or custom tags like ‘production’ or ‘development’. This is a helpful way to refer back to specific sets of resources for more granular management and visibility. Annotations are stored as key/value pairs, and all keys are prefixed with annotation/.
Annotations apply only to the object they are applied to and will not be propagated down to dependent objects. For example, if you were applying an annotation to a deployment, it would not propagate down to all of the Pods created from that deployment. Note that annotations may be expensive if used heavily; currently, Kubernetes does not support pruning unused annotations from its object store.
To add an annotation, you must use the kubectl annotate command. The syntax for this command requires specifying resource type, name, and desired key/value pair:
$ kubectl annotate [RESOURCE_TYPE] [RESOURCE_NAME] [KEY]=[VALUE]
For example:
$ kubectl annotate deployment myapp-deployment custom-tag=production
Creating Namespaces
Creating namespaces allows you to partition resources into sections so that the same resource name can be used in different parts of the cluster without colliding. For example, if two teams in a company need to use a “database” resource name, they can do this by separating them into different namespaces. You can similarly use namespaces to limit access or quota usage specific to those environments.
Namespaces are created using the kubectl command line tool and its create namespace command. By default, all resources are created within a “default” namespace unless explicitly specified otherwise. Once created, projects within namespaces can reference each other as necessary, depending on how security rules are implemented. Creating a namespace follows this simple syntax:
`kubectl create namespace `
The above command creates a new namespace with the given name for immediate use in the Kubernetes cluster. It is important to note that creating namespaces does not reserve any of your cluster’s resources for the given environment – it only sets up the associated structure allowing you to manipulate and view resources specific to that context without affecting others. Separate access controls must be set up within individual projects utilizing role-based access control settings or other security settings enabled by your cluster administrators as needed.
Debugging Kubernetes Objects
In this section, we’ll look at how to use kubectl, the command line tool used to manage Kubernetes resources, to debug Kubernetes objects. Kubectl is an integral part of Kubernetes and gives you an easy way to view and modify the state of your clusters and workloads.
We will also discuss how to troubleshoot common issues and how to use kubectl to inspect and debug resources.
Logging
Logging is a tool to track Kubectl errors related to a Kubernetes object as your cluster changes. When you come across an error, logging is used to provide more detailed insights into the problem, allowing you to make any necessary changes before chaos ensues.
To log, you must use one of three methods: describe, logs, and the events command.
- Kubectl describes: This command allows you to view basic information regarding a Kubernetes object such as its name and namespace; it also allows you to display any errors that are attributed thereto.
- Kubectl logs: This command allows you to access the application’s log output in order to troubleshoot any potential problems that may have arisen when the application was last run. To utilize these logs, simply specify which container in which pod or node of your cluster is experiencing issues and this command will return a verbose list of activities that are associated with the source of your problem.
- Kubectl events: Lastly, this command allows one to track all kinds of events that occur within specific objects such as Pod creation, deletion or service binding activities. Issues like irregular responses (pods crash looping/ restarting) can easily be isolated using this high-level filtering system as no other element from the cluster will be displayed in result sets unless explicitly stated.
Troubleshooting
The troubleshooting section of it will be critical in our debugging process, as it allows you to print debug-level logs and investigate different aspects of the Kubernetes objects. To enter the troubleshooting command, simply issue “kubectl [action] –troubleshoot”.
Upon entering this command, the Kubernetes object will be scanned for events related to its configuration that have occurred in the past few seconds. The results will be documented along with a response code that indicates if an error was identified.
The other two commands available with debugging are “kubectl describe” and “kubectl log”. With “kubectl describe”, you can get information about individual Kubernetes objects such as replication sets and deployments. This can help identify any errors in configuration or misconfigured properties of the object. And with “kubectl log”, you can view the log history for any specified objects or nodes within your cluster. This can come in handy if you want to investigate a specific component within your cluster or identify potential errors with specific processes running on nodes within your system.
Each of these commands affords an inside view into your cluster and its respective deployments, which can help pinpoint errors related to configuration or misconfigured properties quickly and easily. Understanding this component of Kubectl is a critical part of managing Kubernetes objects effectively and efficiently.
Debugging with Kubectl
Debugging Kubernetes objects can be an involved process. Kubectl is a command-line tool used to deploy and manage applications in your container environment with the help of Kubernetes. This tool allows you to troubleshoot and debug objects from a single location, which makes it a powerful resource for managing your cluster environment.
It allows you to view detailed information about Kubernetes objects, such as pods, services, deployments, and replica sets. You can also use it to create new objects or modify existing ones. To do this, you need to learn how to use the many commands available in Kubectl for debugging purposes. Here are a few useful ones:
- Describe: Used to view detailed information about a specific object (including the status of each object), e.g., ‘kubectl describe deployment/my-deployment’.
- Logs: View log messages from pods while they’re running, e.g., ‘kubectl logs my-pod -f’.
- ‘Get’: Retrieve basic details about one or more objects stored in your cluster, e.g., ‘kubectl get pod my-pod’.
- ‘Edit’: Modify the configuration of an existing object via the command line text editor, e.g., ‘kubectl edit deployment/my-deployment’.
- ‘Delete’: Immediately stops and removes an existing object from your cluster permanently, e.g., ‘kubectl delete service my-service’.
FAQs
What are Kubernetes objects?
Kubernetes objects are API resources used to define the desired state of a cluster and manage its resources. Examples include pods, services, and deployments.
How do I create a Kubernetes object using kubectl?
Kubernetes objects can be created using YAML or JSON files or by using commands such as create.
How do I delete a Kubernetes object using kubectl?
Kubernetes objects can be deleted using commands such as delete.
How do I view the status of a Kubernetes object using it?
The status of Kubernetes objects can be viewed using the commands such as get or describe.
How do I update a Kubernetes object using kubectl?
Kubernetes objects can be updated using commands such as edit or by modifying the YAML or JSON file used to create the object.
What is a Kubernetes namespace?
A Kubernetes namespace is a virtual cluster used to isolate resources and manage access to them.
How do I create a namespace using kubectl?
A namespace can be created using commands such as create namespace.
How do I switch between Kubernetes contexts using kubectl?
Kubernetes contexts can be switched using commands such as config use-context.
How do I deploy an application using kubectl?
An application can be deployed using commands such as apply or by creating a deployment object.
How do I scale deployment using kubectl?
A deployment can be scaled using commands such as scale or by modifying the deployment object.
What is a Kubernetes secret?
A Kubernetes secret is an object used to store sensitive information such as passwords or API keys.
Conclusion
In conclusion, Kubectl is a powerful tool that allows users to manage Kubernetes objects and clusters from the command line. Understanding how to use it effectively can help streamline the deployment, scaling, and management of containerized applications. With its intuitive commands and powerful features, it is an essential tool for anyone working with Kubernetes. From creating and modifying Kubernetes objects to managing secrets and namespaces, It provides a flexible and efficient means of managing Kubernetes clusters. Whether you are a seasoned Kubernetes user or just getting started, learning to use it is a valuable skill that can help you better manage your Kubernetes objects and clusters. By following the best practices and techniques outlined in this guide, you can use Kubectl to its full potential and achieve greater efficiency and productivity in your Kubernetes management tasks.